
Design for Safety is a little known consideration for most young architectural designers who are just starting out.
Building regulations now state that designers must be aware and document hazards, risks and proposed mitigation measures to ensure that all safety concerns have been addressed for the construction, occupancy, maintenance and demolishment of the building.
In this post, I will share how design for safety is done, key definitions and design considerations.
Note : This posts serves as a guideline. It is based on building regulations from Singapore, so please consult your country’s building codes as well.
In this post:
Objective and Process
Hazards, Risks and Mitigations
How to Measure Risk
Documenting in the Risk Register
Pro Tips
Risk Register Template
Resources
Objective & Process
Design For Safety (DfS) ensures that designers do not produce designs that cannot be constructed, maintained, used or demolished in a reasonably safe manner.
It involves multiple parties and is important during three main stages - concept design, schematic design and pre-construction stage.
The following parties are involved:
- Designers - Architects, engineers
- Developer
- Contractor
- Certified Design For Safety Professional

4 steps to Design For Safety:
Step 1 -Identifying Hazards & Risks
All parties are to assess the design and identify potential hazards.
The following are a guide on the aspects that the project team should be aware of:
- Accessibility
- Confined space
- Emergency
- Lighting
- Excavation
- Fall prevention
- Working platforms
- Hoisting or weight
- Layout
- Maintenance
- Material handling or storage
- Means or methods
- Operation
- Physical hazards
- Sequence of construction
- Standardisation of building elements
- Weather
Step 2 - Eliminating or Substituting Hazards
Designers should brainstorm how best to remove the hazard
If it is not possible, replacing it with another hazard with a lower risk will do.
Step 3 - Measuring Risk - Categorizing by Severity and Likelihood
Risk levels will be assigned based on the level of severity and likelihood
Step 4 -Documenting Action to mitigate risks
- Risk register shall be endorsed by all parties showing the actions to be taken
- This document will be passed to the eventual owner for his reference
Be familiar with The G.U.I.D.E process
In summary, use the GUIDE process for design for safety:
- G - Group together a review team of main stakeholders
- U- Understand the full design concept by looking at drawings & calculations, or have designers elaborate their design
- I - Identify Risks that arise as a result of the design or construction method. The risks should be recorded and analysed to see if they can be eliminated by changing the design
- D- Design around the risks identified to eliminate or to mitigate the risks
- E- Enter all the information including information on vital design change that would affect safety and health or remaining risks to be mitigated into the DfS Risk Register
Hazards, Risks & Mitigations
Now, let’s dive deeper.
First, we need to understand the main difference between hazards and risks:
Hazard:
- Anything that can cause harm.
Risk:
- A chance or probability that harm may occur
See the graphic below for an example.

The team’s job during DfS Reviews is to discover the various types of hazards.
Types of Hazards & Risks
Below is a sample list of hazards and their corresponding risks.
Note that the risk always involves the following: injury, death to personnel or damage to property

Want to get a headstart in your career in architecture?
Get your copy of the exclusive PDF download - 400 pages, 20 topics, crisp diagrams and searchable text!
How to measure risk

To measure the risk, we need to rate the severity and likelihood of that risk arising.
Both of these factors range from 1-5, with 5 being the most risky.
The multiplication of the assigned levels of severity and likelihoods gives the overall level of risk.
The description of the levels of severity and likelihood is as follows:
Severity
Level 5 - Catastrophic
Death, fatal diseases or multiple major injuries
Level 4 - Major
Serious injuries or life-threatening diseases
Level 3 - Moderate
Injury or ill-health requiring treatment
Level 2 - Minor
Injury or ill-health requiring first-aid only
Level 1 - Negligible
Nothing of a concern
Likelihood
Level 5 - Almost Certain
Continual or repeating experience
Level 4 - Frequent
Common occurrence
Level 3 - Occasional
Possible or known to occur
Level 2 - Remote
Not likely to occur under normal circumstances
Level 1 - Rare
Not expected to occur but still possible
Once the risk level is established for each hazard, the team should discuss how to reduce the likelihood to cause a resultant decrease in risk level from HIGH to MEDIUM or LOW.
Pro Tip: Note that severtity of risk cannot change because the impact is still the same if the accident happens. We can only reduce the overall risk by reducing the chance of it happening.
Documenting Hazards, Risks and Mitigation Strategies
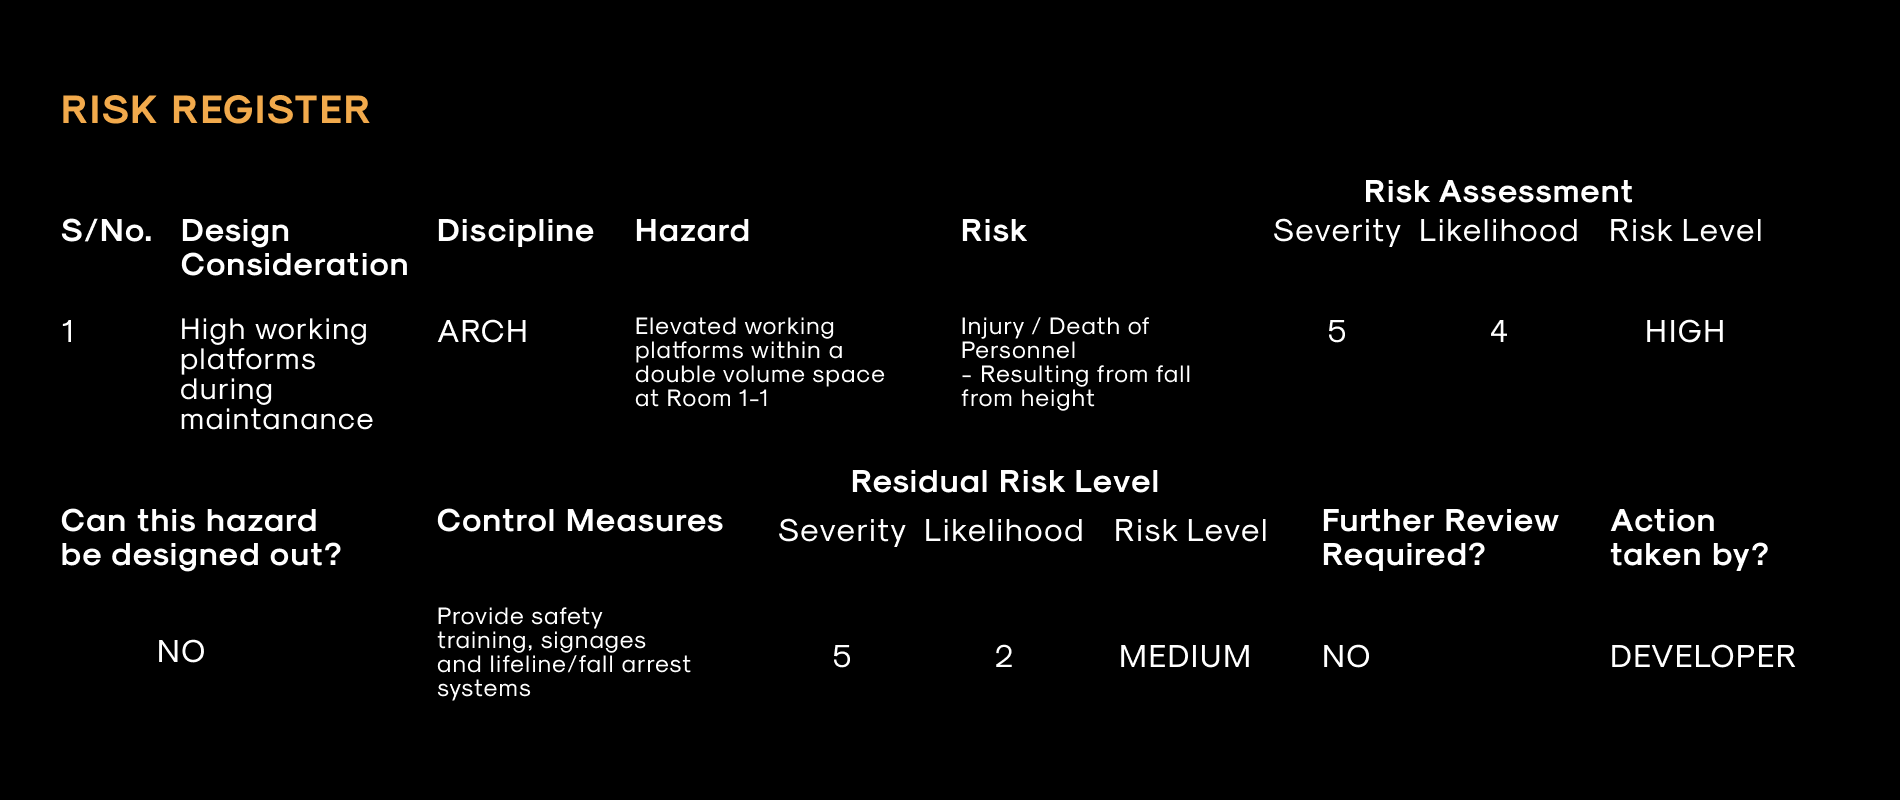
The most important deliverable is the risk register where all parties declare the various hazards, risks and mitigation strategies for this project.
This document holds accountability to the undersigned and will be issued to the owner after building construction is completed.
Some notes:
- The answer to “Can this hazard be designed out?” should never be Yes. If so, you need to design the hazard out, ie, remove it.
- The mitigation strategies do not reduce severity as the extent of the injury will be similar if the mitigation measures do not help. These strategies often times reduce the likelihood only. On the (rare) occasion someone falls over a roof despite the measures in place, the personnel may still fall to his death.
Download the Risk Register Template
For your own learning, try documenting the various hazards, risks and mitigations in your design projects using this template.

Pro Tips
1) Construction, Occupancy & Maintenance
These are the stages to consider various hazards and risks.
View the design one aspect and user (construction workers, occupants and maintainance staff) at a time.
2) Design out the hazards as far as possible
Designers like us must design out all hazards as far as possible.
When filling out the risk register, ask the following question -
“Can I eliminate this hazard?”
3) We cannot prevent unsafe acts but...
..we can, as designers, prevent unsafe conditions.
Ultimately, we should at least take time to step into the shoes of people who will interact with the building and see if they can be safe throughout. A human life is precious.
Resources
WSH (Workplace Safety & Health, Singapore)
IES Singapore (The Institution of Engineers Singapore)


