
Drainage design is a collaborative effort between architects and engineers.
Architectural designers typically comes up with a rough drainage concept for engineers to calculate and concur.
In this post, I will share how drainage design is done, including me providing you with key definitions and design considerations.
Note: This posts serves as a guideline. It is based on building regulations from Singapore, so please consult your country’s building codes as well.
Post Contents
Why Drainage Design?
Keys Terms
Types of Drains
Design Considerations
Pro Tips
Excel Calculator
Why Drainage Design?
The main purpose of drainage design is to ensure safe and clear discharge of rainwater captured within the development to public open drains outside site boundary. It is also to prevent any flooding and unwanted flow of water out of the site.
It is important for architects and engineers to provide drainage plans to certify adequate drains sizes is provided during building plan submissions.
As architectural designers, we should understand that the fundamental concepts, best practices and basic calculations for drainage design.
Key terms
The following are key terms and definitions you should know while designing drainage:
Drains - Channel or pipe carrying off surplus liquid, especially rainwater or liquid waste.
Invert Level - Base, lowest interior level of the drain
Top Level - Uppermost level of the cover/grating of the drain
Width - Horizontal dimension of drain
Depth - Vertical dimension of the drain
Summit Point - Point of drain with highest invert level, where water collected starts to flow from towards discharge point
Discharge Point - Point of drain, usually at the perimeter exit to open drains, where drain invert level is lowest.
Culvert - Structure/pipe that allows water to flow under a road
Grating - Cover made of parallel or crossed bars, typically preventing access through the drain opening
Gradient - Measure of how steep a slope is, typically measured as a ratio of vertical to horizontal distance
Peak runoff - Highest possible rate of flow of water at a specified point along the drain channel.
Catchment Area - Regions/sub-regions within development allocated to drain off towards a selected network of drains
Types of Drains

The above diagram shows the cross sections of various types of drains we have at our disposal for drainage.
Each of these opening types have different dimensions (width, depth, radius), cost and use cases.
Typically for external works with drains above pedestrian pavements/apron, we use covered drains like Type S2, or the cutoff drain. See pro tips for the various types of covers.
If there is no nearby human traffic, open drains like C7 may be used.
Design considerations
1) Site Layout & Context

The first step is to enclose the site with perimeter drains to prevent any unregulated flow of water out of the development into neighbouring sites.
Next, you should establish where the discharge points should be. Draw up the plans of the existing drains outside, through site analysis or a survey plan.
2) Catchment Areas & Flow Direction
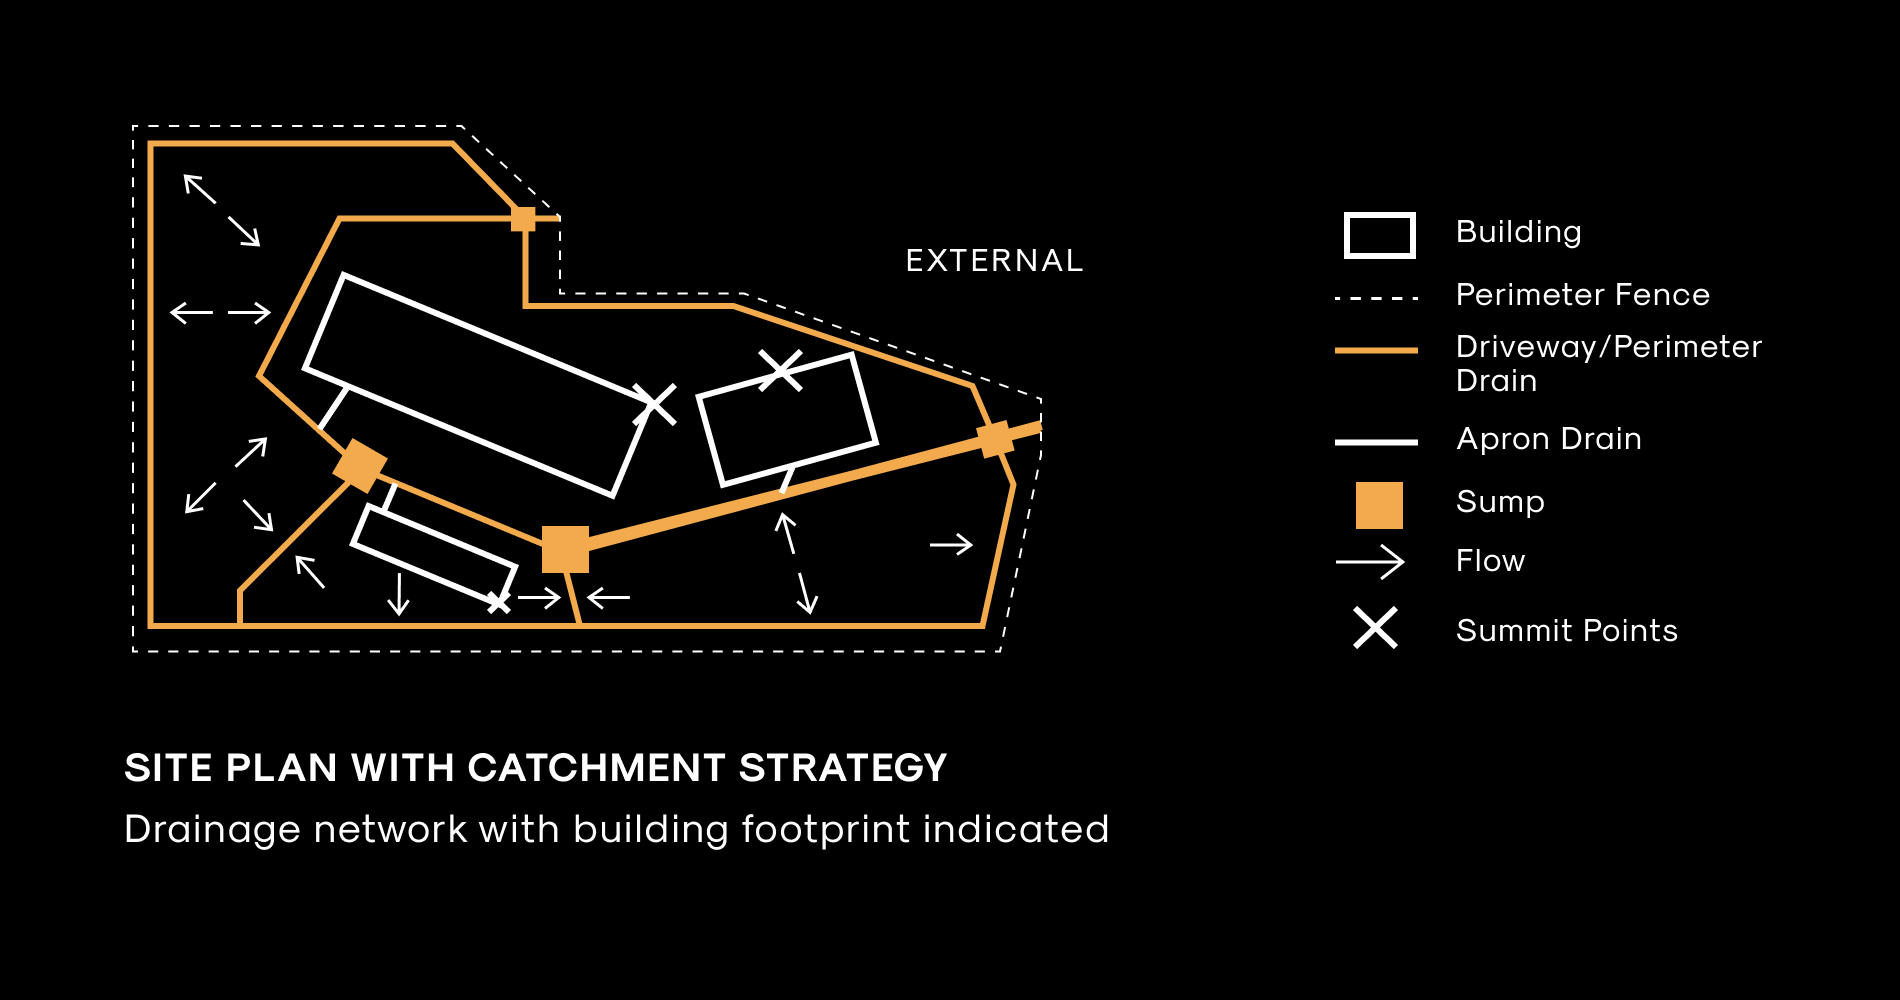
Once you have selected where your discharge points are, you need to come up with a schematic for drainage consisting the following:
- Apron drains for each building (300 mm or 500mm wide)
- Driveway drains
- Perimeter drains
- Sumps to interface drains of different sizes or at junctions.
- Connection between all of the above
- Path towards discharge point
- Flow direction(s) - one way or two ways
Next, you should decide where the summit point(s) are.
Typically, summit points are at the further ends of the building apron drains, they are indicated by crosses in the image above.
Want to learn more architecture and get a headstart?
Get your copy of the exclusive PDF download - 400 pages, 20 topics, crisp diagrams and searchable text!
3) Summit Points, Discharge Points & Flow Direction

Once you have decided the overall flow direction, map it out below.
The general rule of thumb is that to have at least 2 discharge points as a precaution, while summit points are the furthest ends from the discharge points.
4) Slope Gradient, Top & Invert Levels

After establishing the summit and discharge points, a study of the all of the invert levels throughout the network shall be done.
We start at the summit point, where the invert level is 300mm below the top level of the drain.
Following which, the subsequent point of the drain should have an invert level lower based on the distance and fixed drain slope gradient.
See the next section to learn how to calculate.
How to calculate

Let’s say point A is the upper invert level (4.300) and point B is the unknown lower invert level
In order to calculate the invert levels, you need the following values:
- Starting invert level (4.300)
- Gradient (1:x, where x=300)
- Distance (90m)
You can get the invert level by first finding the vertical distance (rise) - this is the distance divided by x (or 300).
Then convert the units to meters and subtract this from the upper invert level.
To calculate the depth of the drain, take the difference of the top level and invert level. As a safety precaution, the depth of the uncovered drain should not exceed 1m.
Good news, I have made an excel calculator template to facilitate your calculations.
Feel free to download and duplicate for your own use.
Let me know what you think about this calculator.
Drainage Invert Level Calculation Excel Template
I have created a handy calculator for you to better understand the various parameters when calculating invert levels.
Download the Google Sheet template here. (Requires Google Account)

Pro Tips
1) Vertical grating are required at all discharge points leading to open public drains - this is to prevent any transfer of silt or rubbish. However, this needs to be maintained by the owner regularly.
2) If the invert levels of drain cannot meet invert levels at the perimeter , try adjusting slope gradient or introduce cascading drains (stepped drains) to connect the upper and lower invert levels in a shorter distance.
3) Types of drain cover include metal gratings, heavy duty gratings, metal checkerplate covers, and RC/precast covers.
Each have their own use cases.
For example, checkerplate is used for accessibility as it does not have any holes that may result in wheelchair wheels becoming stuck.


